Using N-Stalker Tool to Scan Web Applications

Filed in Uncategorized
  1. Launch N-Stalker, wait till the GUI appears then click ‘ Update ‘ to update application

Screen Shot 2018-05-29 at 21.41.10

2. N-Stalker will soon update the database, wait some few minutes

Screen Shot 2018-05-29 at 21.44.36

3. After the database update complete, click Start to rescan a new session

Screen Shot 2018-05-29 at 21.44.44

4. In the N-Stalker wizard, enter a URL of the web apps that will be scanned. For this example we use http://10.0.0.2/goodshopping. Choose OWASP Policy in Scan Policy tab then click next

Screen Shot 2018-05-29 at 21.44.53

5. URL Restriction box will pop-up, click yes to continue

Screen Shot 2018-05-29 at 21.45.04

6. Click Optimize Settings, leave it default and click yes

Screen Shot 2018-05-29 at 21.45.11

7. Click yes on the Settings not Optimized box

Screen Shot 2018-05-29 at 21.45.17

8. Click Review Summary, then click Start Session

Screen Shot 2018-05-29 at 21.45.23

9. Start Scan after complete finishing the configuration of N-Stalker to start scanning the website

Screen Shot 2018-05-29 at 21.58.36

10. It will soon scan the website, as the chart is moving

Screen Shot 2018-05-29 at 21.58.43

11. Let the apps scan the website. It has 4 steps which are Spider, Info Gather, Run modules, Sig Scanner

Screen Shot 2018-05-29 at 21.59.36

12. After finish the scanning, wizard box will appear. Click save  scan result and keep scan session for further analysis, and then ‘ Next ‘

Screen Shot 2018-05-29 at 21.59.42

13. Summary of vulnerabilities will be shown, click done after finish examine that

Screen Shot 2018-05-29 at 21.59.50

14. On the left side, expand all nodes to see websites pages

Screen Shot 2018-05-29 at 22.00.06

15. Complete scan results can be seen the dashboard, it can also expand all the vulnerabilities of site’s vulnerabilities

Screen Shot 2018-05-29 at 22.00.27


Posted by : Raden Aditya Pribadi – CS2020 – 2001605116

Using WebCruiser Tool for SQL Injection Testing

Filed in Uncategorized
  1. Launch Web Cruiser apps and wait till the main windows appears

Screen Shot 2018-05-29 at 14.53.33

2. Enter the URL that will be scanned, this example we use http://10.0.0.2/goodshopping where 10.0.0.2 is the server of the host machine where the website is hosted. Click ‘ Scan Site ‘ to start the scanning

Screen Shot 2018-05-29 at 14.53.48

3. If a software disclaimer pop-up appears, click OK to proceed

Screen Shot 2018-05-29 at 14.54.00

4. The scanning start with URL scan, but it also show the vulnerabilities as well as the site structure as seen in the screenshoot

Screen Shot 2018-05-29 at 14.54.12

5. Try to right click each of the vulnerabilities, then click SQL Injection POC  which is Proof of  Concept

Screen Shot 2018-05-29 at 14.54.20

5. It will launch the SQL Injection then click ‘ Get Environment Information ‘

Screen Shot 2018-05-29 at 14.54.32

6. It shows information about environments which the site is hosted. By collecting vulnerabilities information, attacker can simulate exploitation to hack a web application to gain unauthorized information.

Posted by : Raden Aditya Pribadi – CS2020 – 2001605116

Using ID Serve to Footprint a Webserver

Filed in Uncategorized
  1. Open ID Serve, if there is a security warning pop up appears, click run to proceed the program. Main ID Serve main window will show up, click server query tab

Screen Shot 2018-05-28 at 21.19.07

2. Enter the URL for this example will be www.juggyboy.com then click the ‘ Query The Server ‘

Screen Shot 2018-05-28 at 21.19.26

3. From the result, the attacker can analyse the vulnerability on the version that ID Serve succeed to footprint

Posted by : Raden Aditya Pribadi – CS2020 – 2001605116

Using Metasploit to Flood Target Host

Filed in Uncategorized
  1. Log into the Kali Linux, type nmap -p 4444 then press enter, to check port 4444 is open or not. The result should show that the port is open.

Screen Shot 2018-05-23 at 09.48.31

2. After you ensure that the port is open, begin the SYN flooding on the victim. Launch msfconsole, but first start postgresql and metasploit services

Screen Shot 2018-05-23 at 09.56.17

3.  Type msfconsole in the command line terminal

Screen Shot 2018-05-23 at 09.59.36

4. Type use auxiliary/dos/tcp/synflood , this will launch the synflood module

Screen Shot 2018-05-23 at 10.01.27

5. Determine all option to begin the DoS attack. Type show option and enter to list all option

Screen Shot 2018-05-23 at 10.04.08

6. Now perfrom the SYN flooding on port 4444 with these commands : set RHOST <IP Address> ; set RPORT 4444 ; set SHOST

Screen Shot 2018-05-23 at 10.07.21

7. The SHOST set is to spoof the IP Address of Kali with windows server 2012. Now after setting all module, type exploit and enter to begin

Screen Shot 2018-05-23 at 10.10.04

8. This should begin the syn flooding. To confirm, open wireshark application to check on the windows machine. Select interface and start

Screen Shot 2018-05-23 at 10.13.04

9. It will display the traffic that coming to the machine.

Screen Shot 2018-05-23 at 10.18.36

10. This show that the IP Address of Kali has been spoofed. Open task manager and click performance to see the CPU usage that show the DoS attack is in progress on the machine

Screen Shot 2018-05-23 at 10.22.25

11. Once you done with the performing, click control + C to terminate attack

Screen Shot 2018-05-23 at 10.23.30

Posted by : Raden Aditya Pribadi – CS2020 – 2001605116

Using WPScan and Metasploit

Filed in Uncategorized
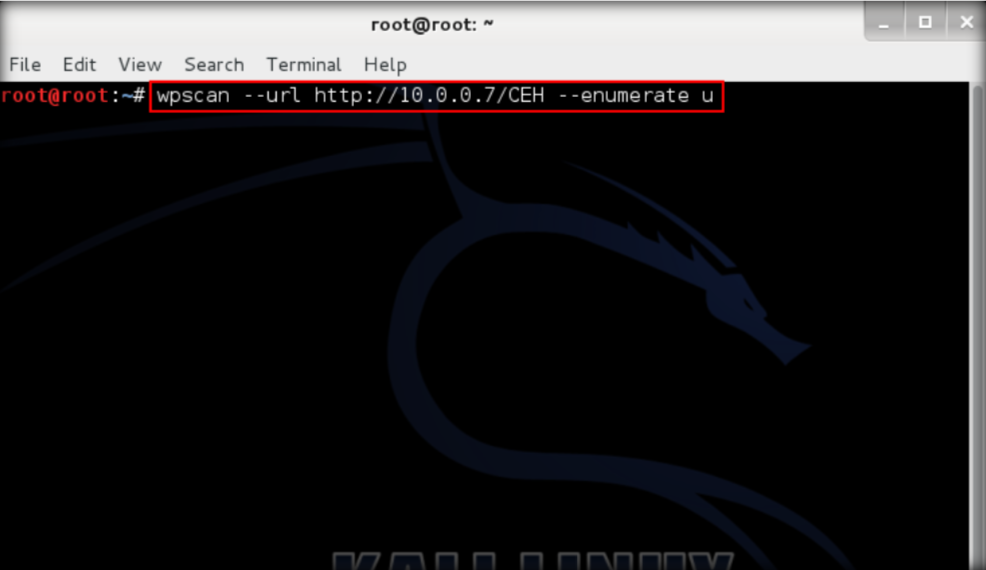
  1. Launch Kali Linux then open terminal command line. Type  wpscan –url http://<IP Address>/CEH –enumerate u

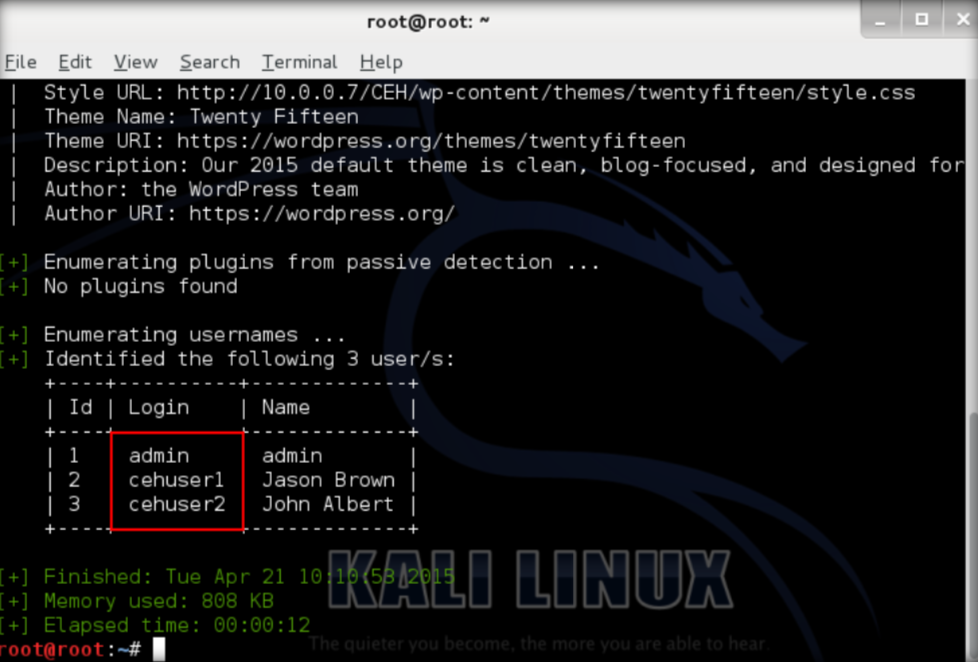
2. Press enter then WPScan starts to enumerate the username from the database

3. Next step is to find the password. Use auxiliary module named wordpress_login_enum and do the attack using the Password.txt . You need to start postgresql service and metasploit service

4. Launch msfconsole

Screen Shot 2018-05-22 at 14.47.35

5. Use wordpress_login_enum, type use auxiliary/scanner/http/wordpress_login_enum then enter

Screen Shot 2018-05-22 at 15.05.19

6. Set PASS FILE to set file containing passwords ; set RHOSTS to set target IP address ; set TARGETURI to set  base path  to wordpress website ; set USERNAME admin to set username as admin

Screen Shot 2018-05-22 at 15.13.22

7. After all options have set, type ‘ run ‘ to execute auxiliary module

Screen Shot 2018-05-22 at 15.15.37

8. Auxiliary module starts to brute force the login

Screen Shot 2018-05-22 at 15.18.34

9. Once the correct password found, the module stop and show the password

Screen Shot 2018-05-22 at 15.22.22

10. Now log into the wordpress site with the username and password that found

Screen Shot 2018-05-22 at 15.24.29

11. Then it should be able to log in and see the home menu

Screen Shot 2018-05-22 at 15.27.21

Posted by : Raden Aditya Pribadi – CS2020 – 2001605116


Using Httprecon Tool

Filed in Uncategorized
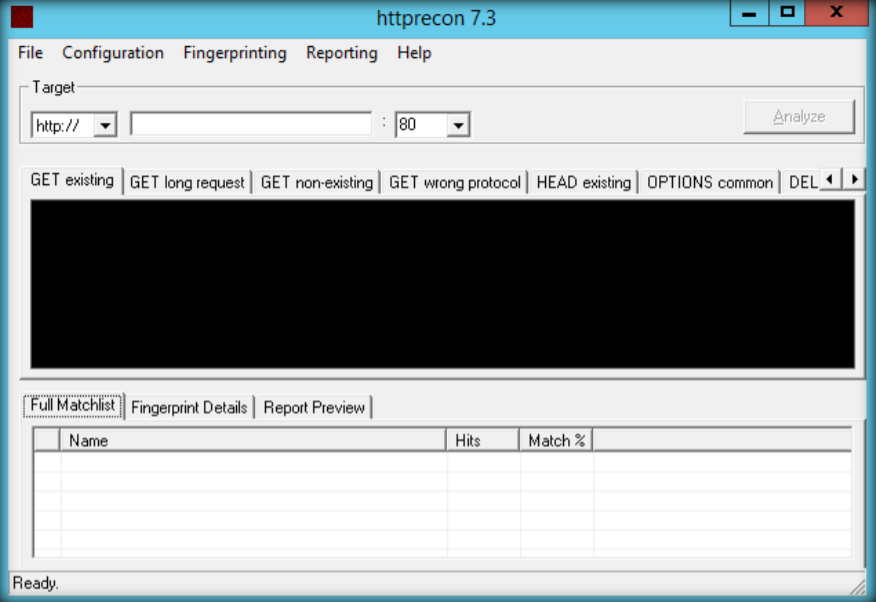
  1. Open httprecon.exe to launch the application, the main window will apper

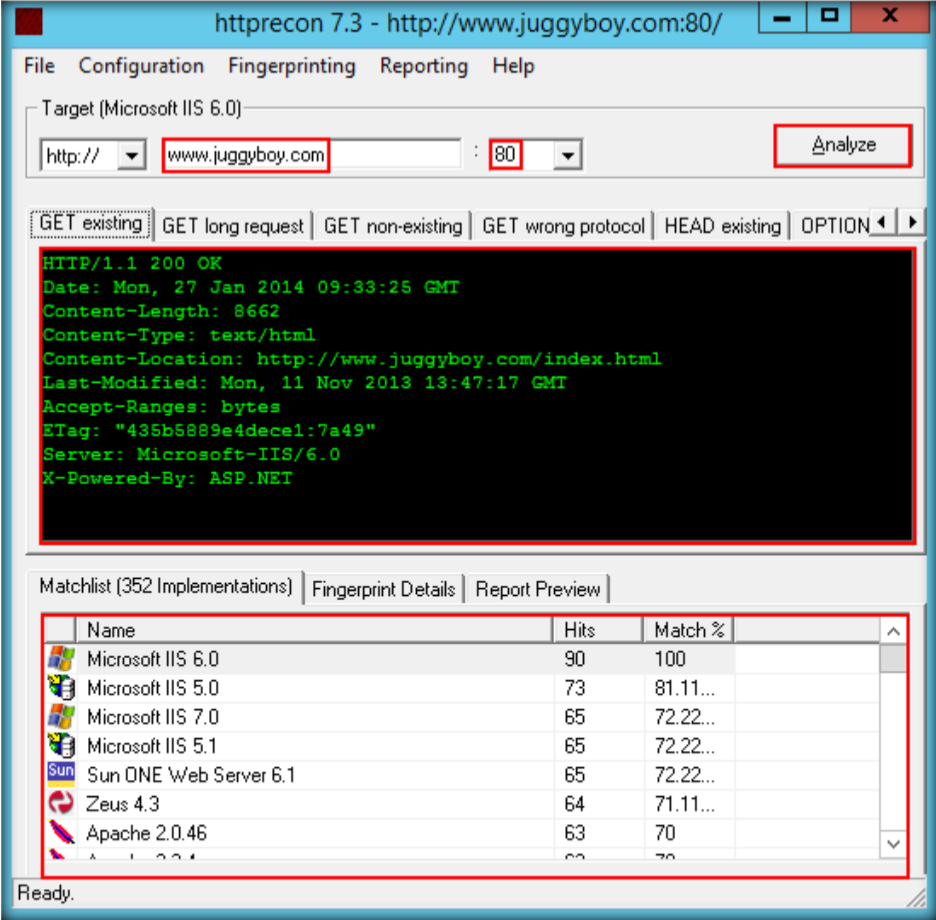
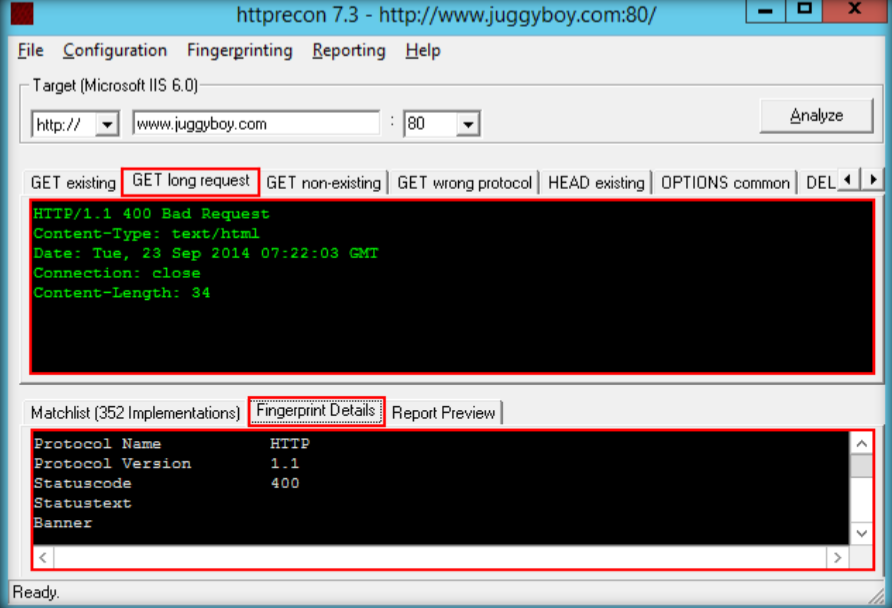
2. Enter website URL that will be footprinted , then select port 80 in target section. Click analyze and footprint result will be shown

3. Scroll down and observe the server used, version, and the server side used to develop webpages. Click the get long request and fingerprint details

4. The details provide the name of the protocol of the website is using and  its version.

Posted by : Raden Aditya Pribadi – CS2020 – 2001605116

Using Social Engineering Toolkit

Filed in Uncategorized
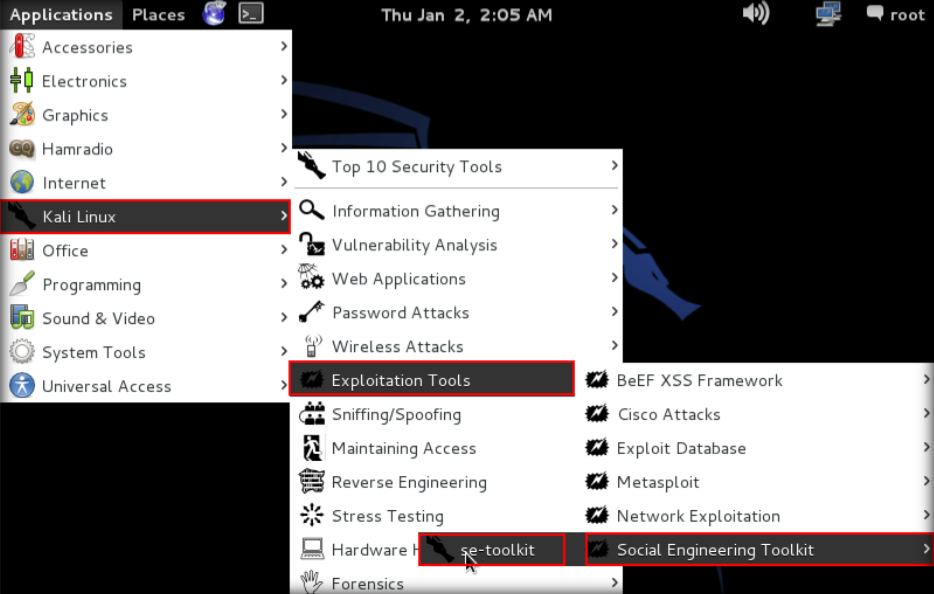
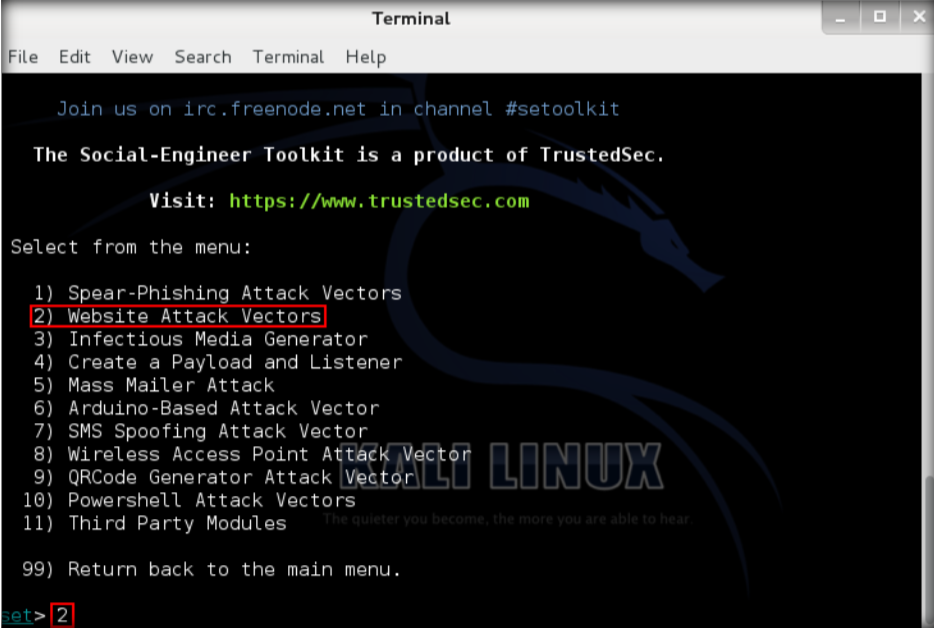
  1. Open Kali Linux, go to : application – Kali Linux – Exploitation Tools – Social Engineering Toolkit – se-toolkit

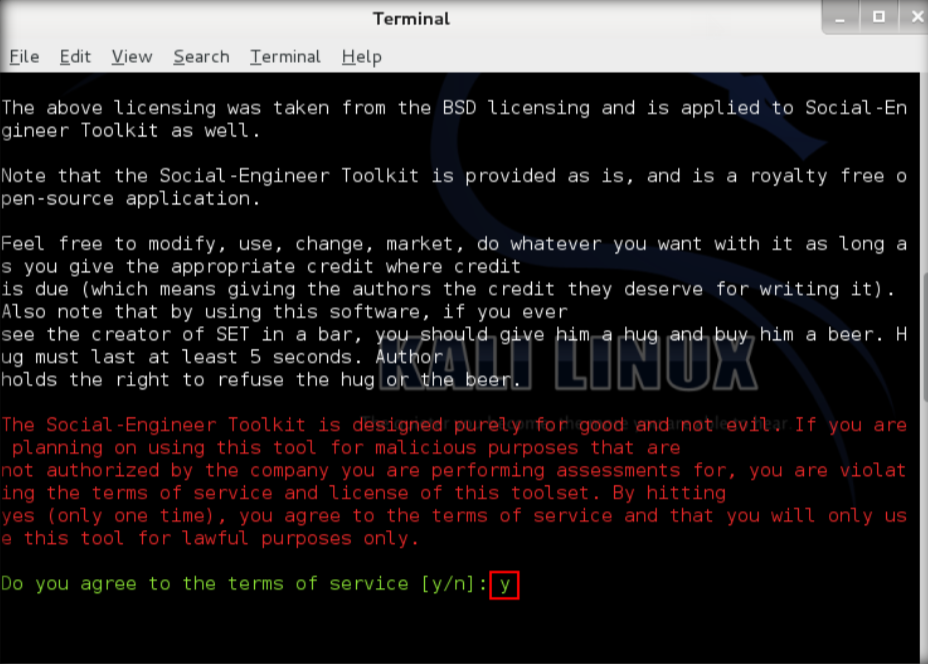
2. Type Y to agree to the terms and conditions

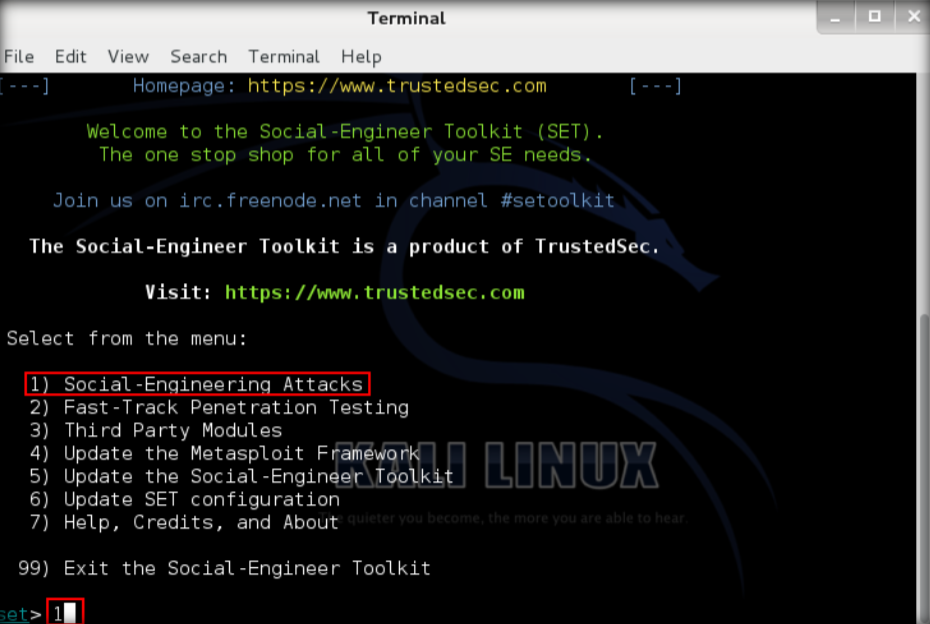
3. After that, Menu will be shown and select 1 from the menu

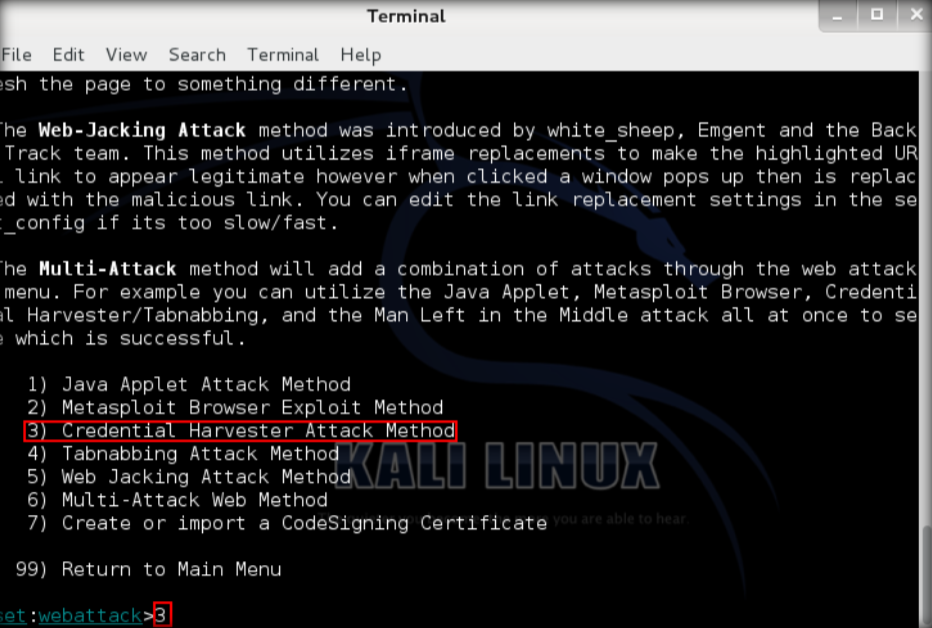
4. List of attack will appears, select 2 for website attack vectors

5. Next step, select 3 for credentials harvester attack

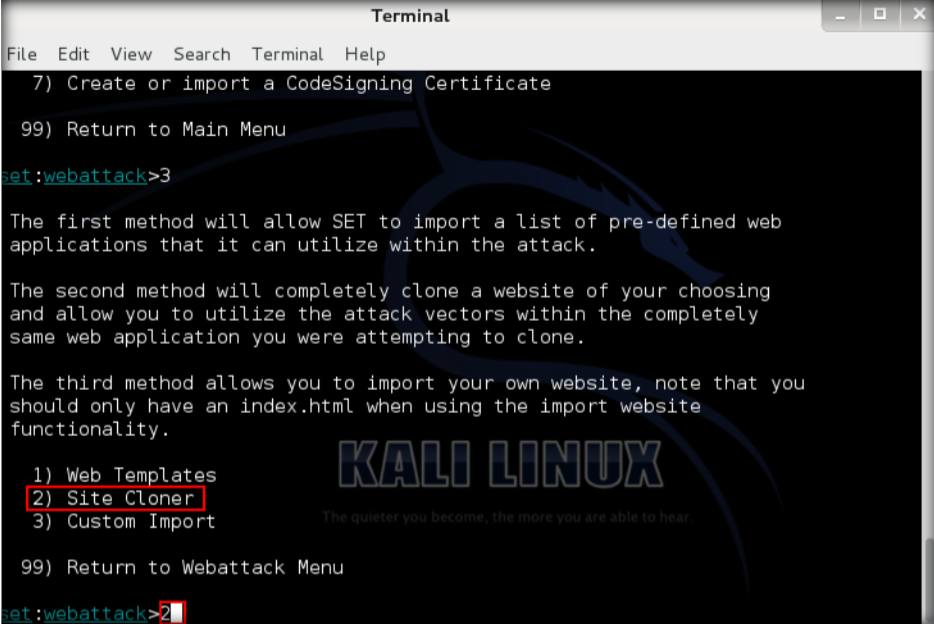
6. Select Site Cloner which is number 2

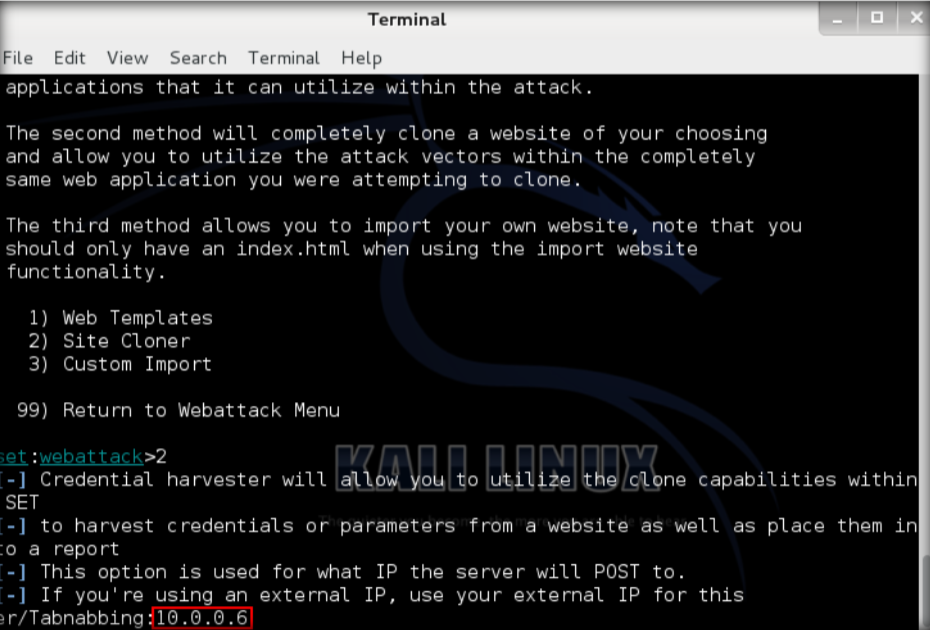
7. Type IP address of Kali Linux virtual machine and press enter.

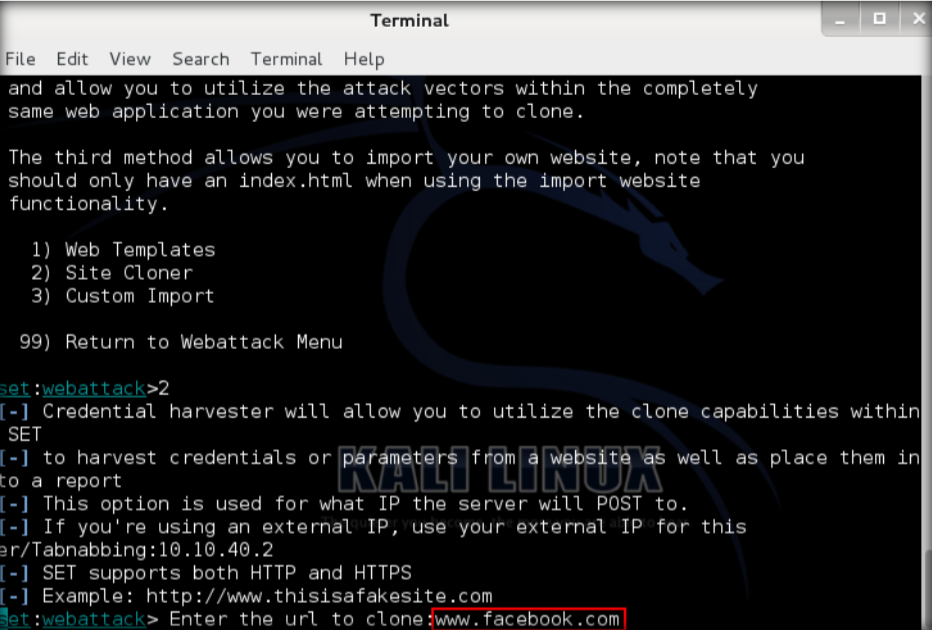
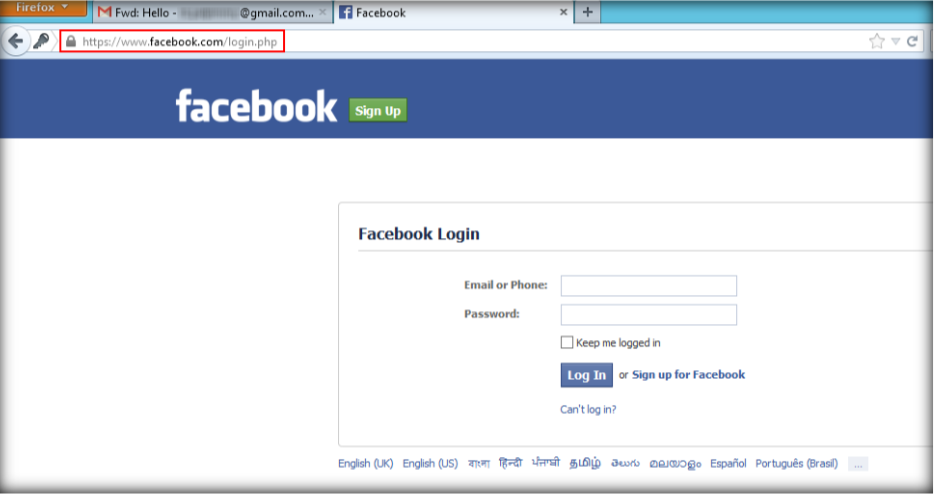
8. Enter the URL to clone. This time, www.facebook.com is the example.

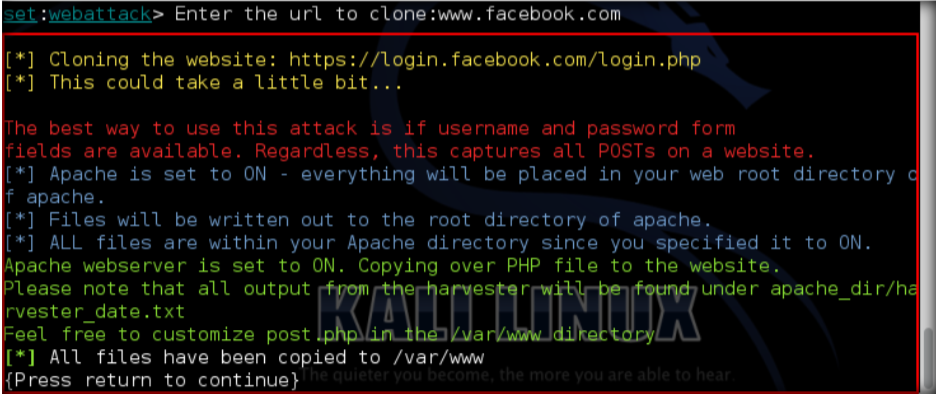
9. After cloning completed, it will start  Credential Harvester

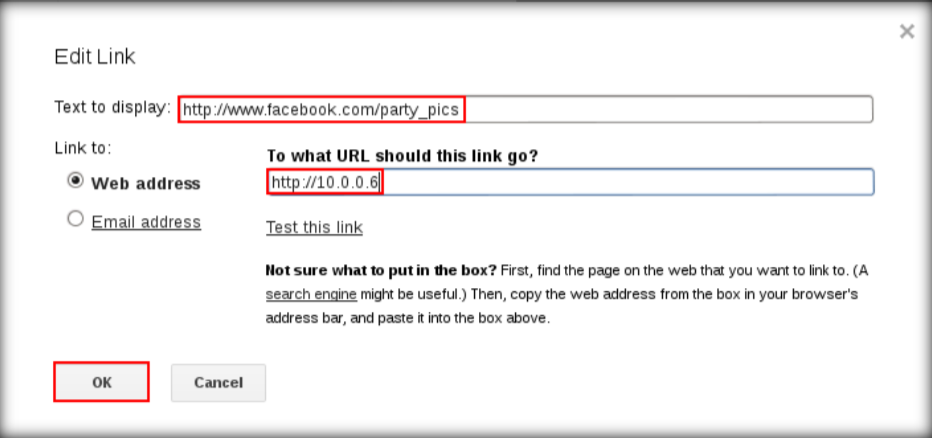
10. Allow credentical harvester attack to fetch infromation from the victim machine. Next step, try to send email to the target so he / she can open and fill the website. Edit the link before sending the email like this.


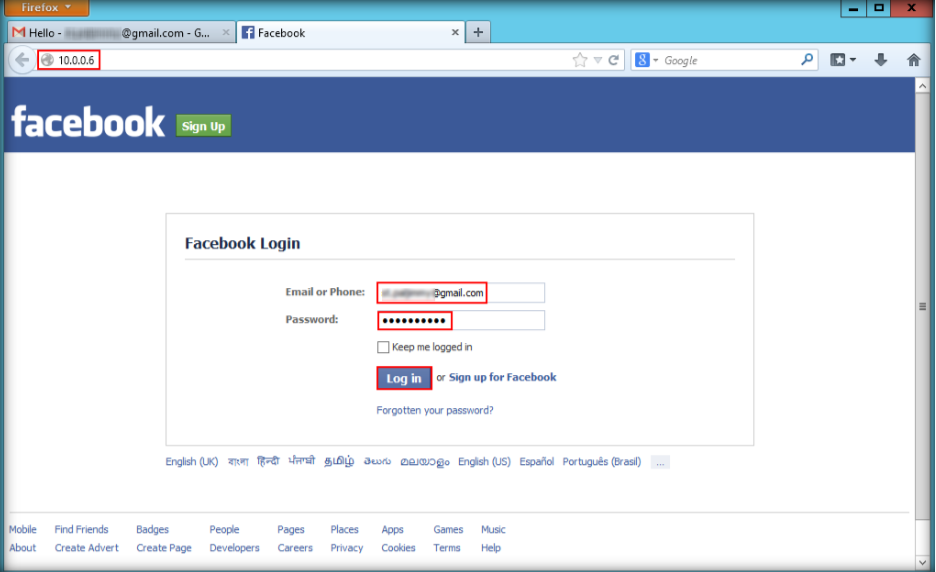
11. Send the email to the target. Now, try to log into victim windows and open the link. Open the site and fill the email and passwords.

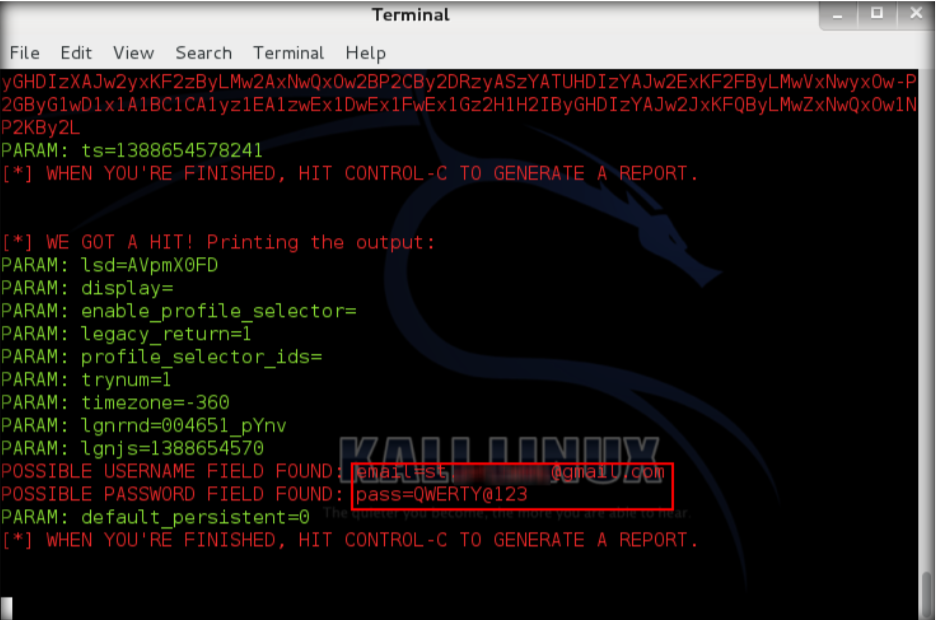
12. Click Log in after fill the email & password, then it will redirect to the real facebook log in page but the email and password data that filled already saved at the set terminal kali linux

13. Open Kali Linux terminal to see the result

Posted by :

Bonfilio Aldrino Sugiarto – CS2020 – 2001611794

Using Netcraft to Detect Phising

Filed in Uncategorized
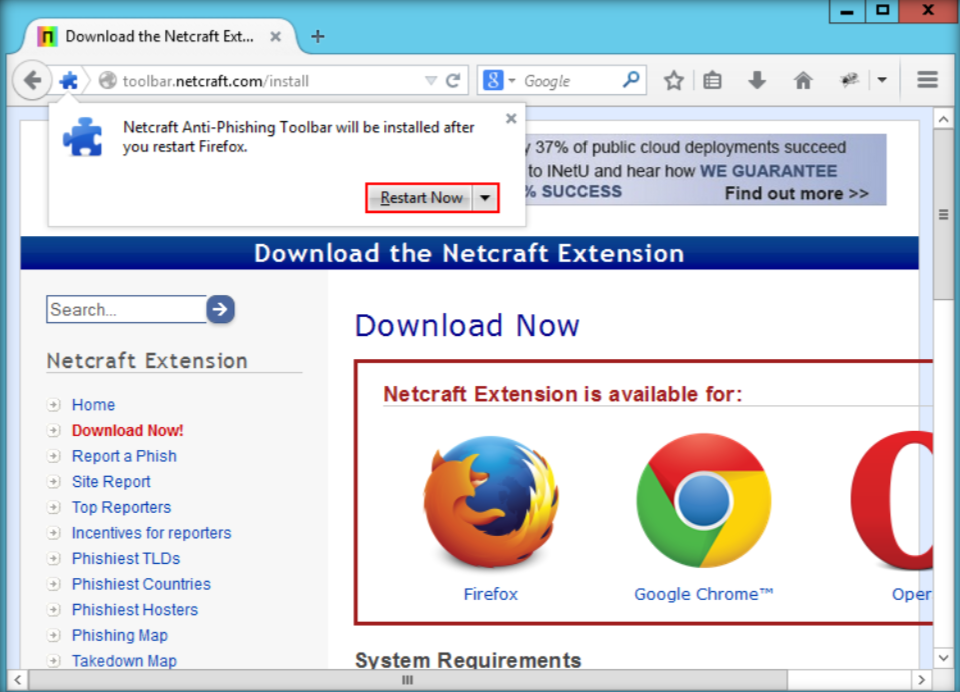
  1. First of all, download Netcraft toolbar at www.toolbar.netcraft.com and follow the installation proccess. Restart your browser after finished the installation

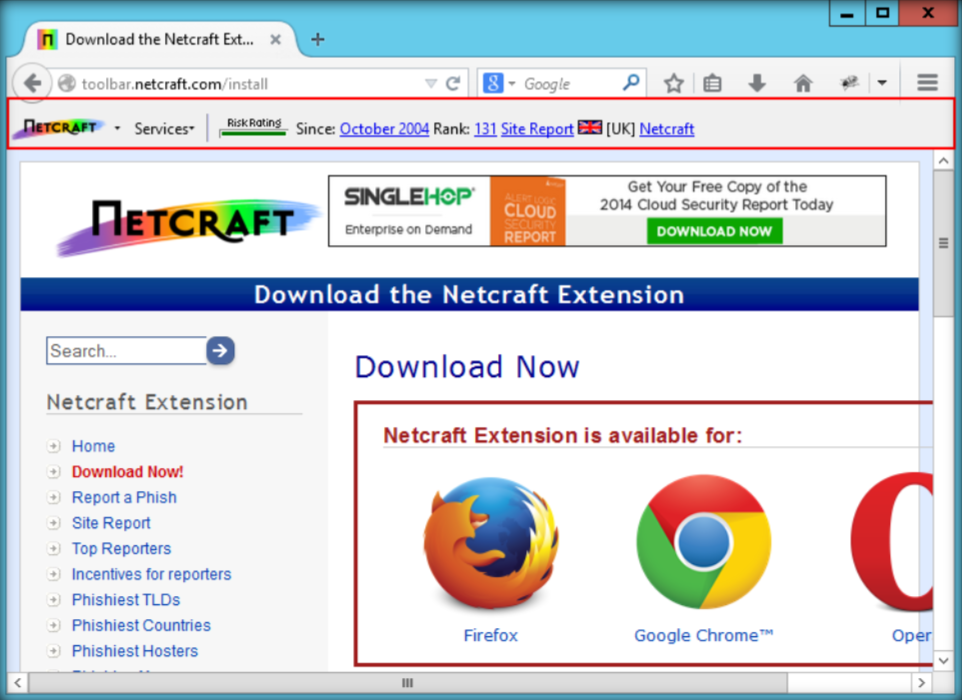
2. After relaunch the web browser, Netcraft Toolbar is now seen in browser window

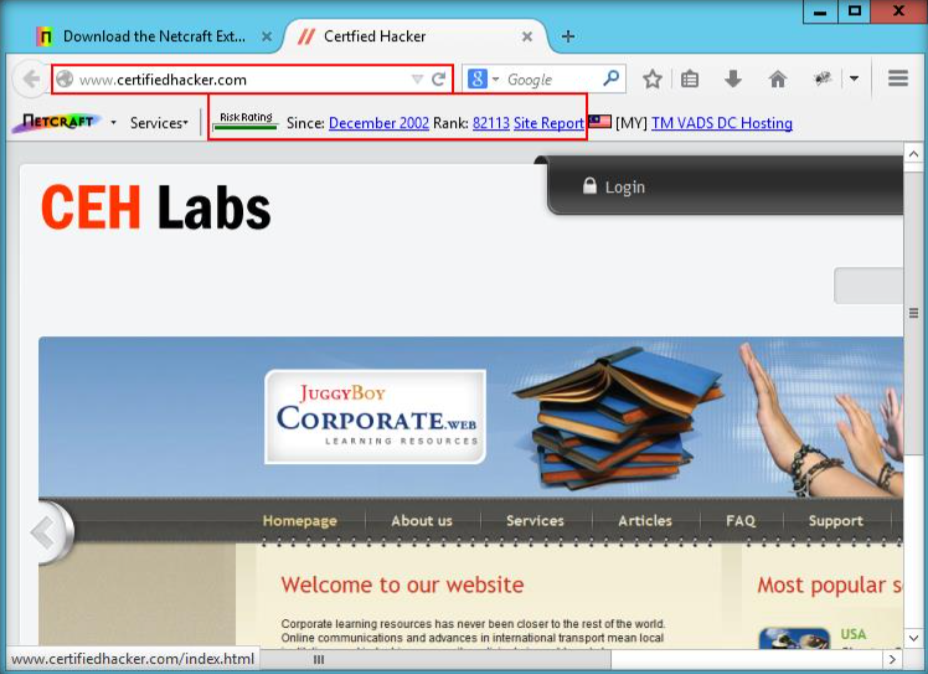
3. To test out, type in the URL bar : www.certifiedhacker.com , press enter to continue. Then certified hacker web page appears and there will be informations such as risk rating, rank, year of the website launched, also flag.

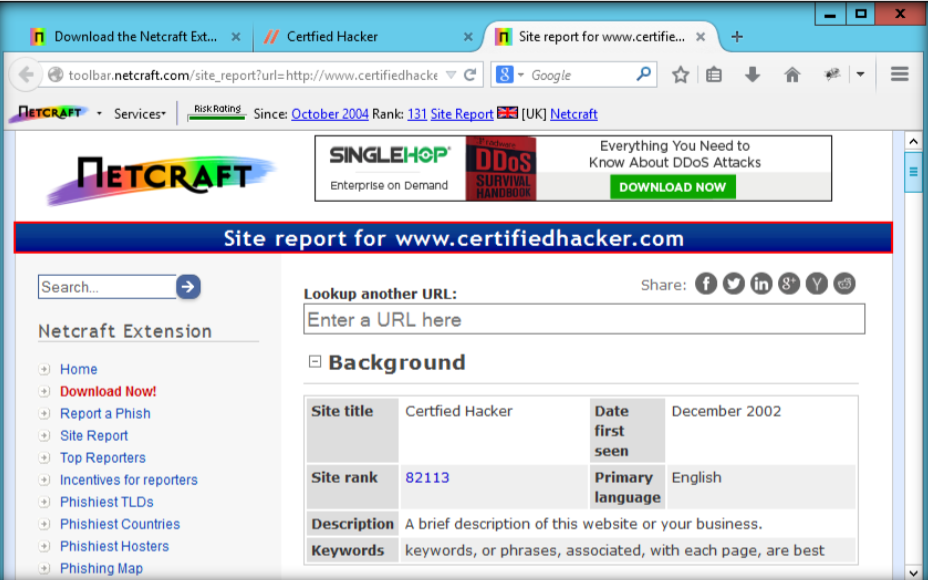
4. Click site report to see details report of the site

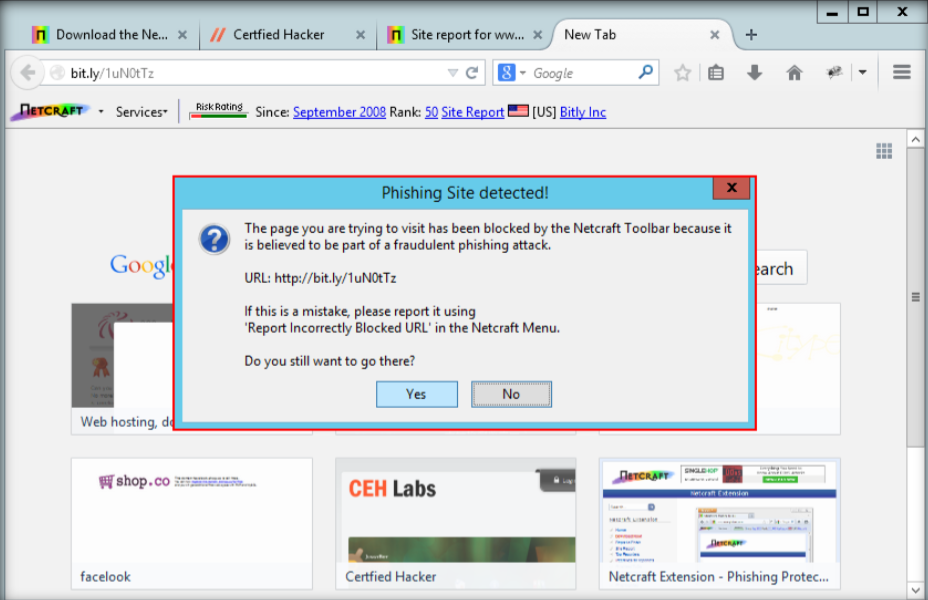
5. If the website you open is identified as an phising site, user will be noticed by the pop up that phising site detected!

\

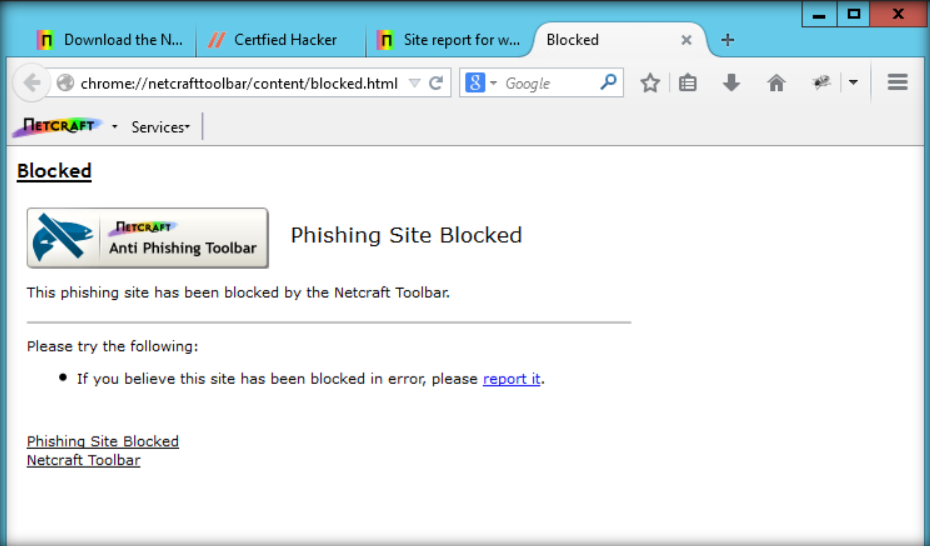
6. Click Yes to trust the site, but click no as recommend to avoid the phising site. The site will be blocked if you click No

Posted by :

Bonfilio Aldrino Sugiarto – CS2020 – 2001611794

Using Web Data Extractor

Filed in Uncategorized
  1. Launch Web Data Extractor on your windows start menu
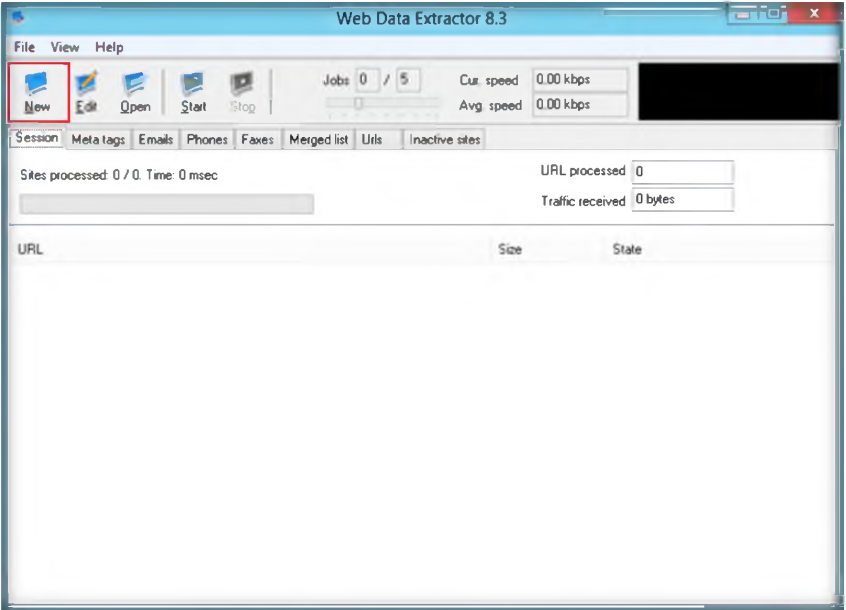
  2. Web Data Extractor is launched and main window appears, click new session to start

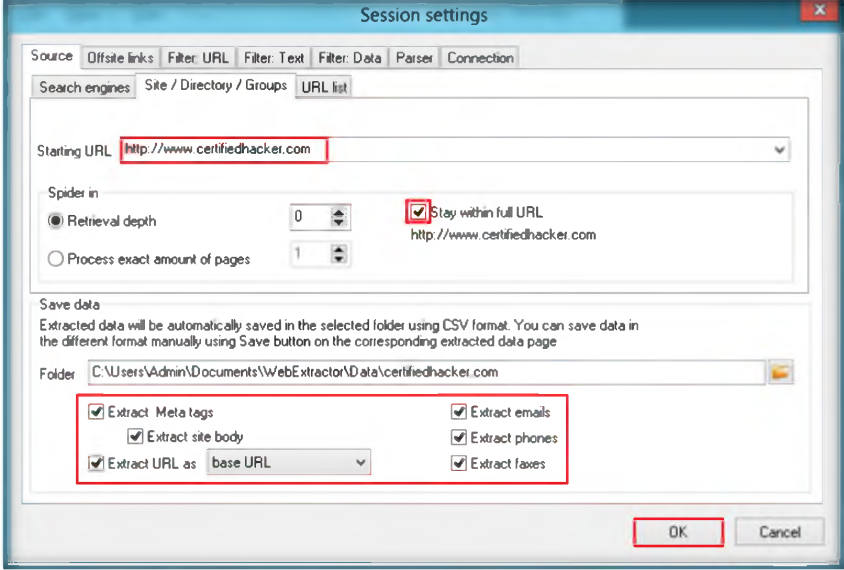
3. Type the URL and check the option to get maximum data

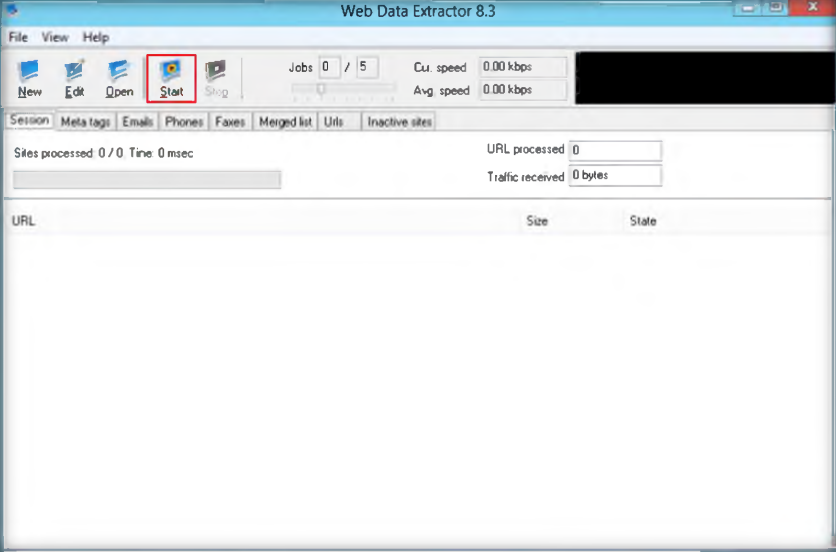
4. Click start to initiate the extractor

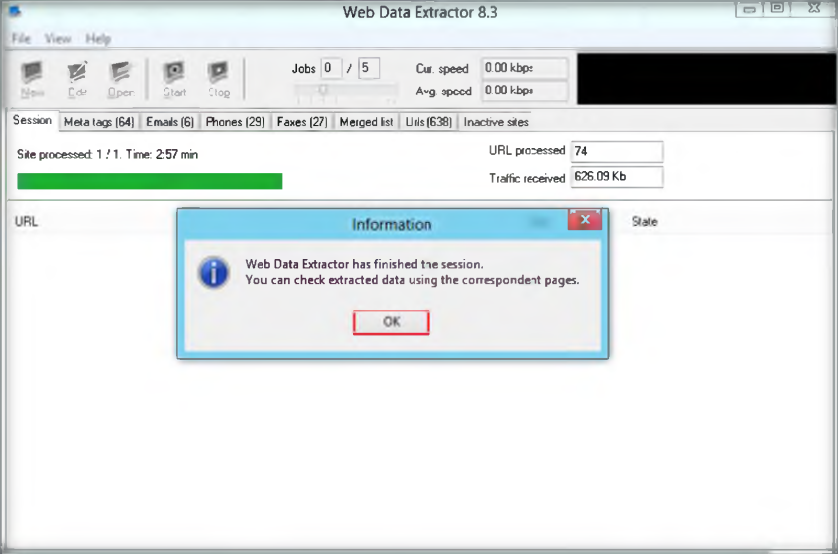
5. Web data extractor starts to extract and collect data, when it’s done there will be information dialog

6. Click OK to show the data that has extracted, by clicking in the tabs

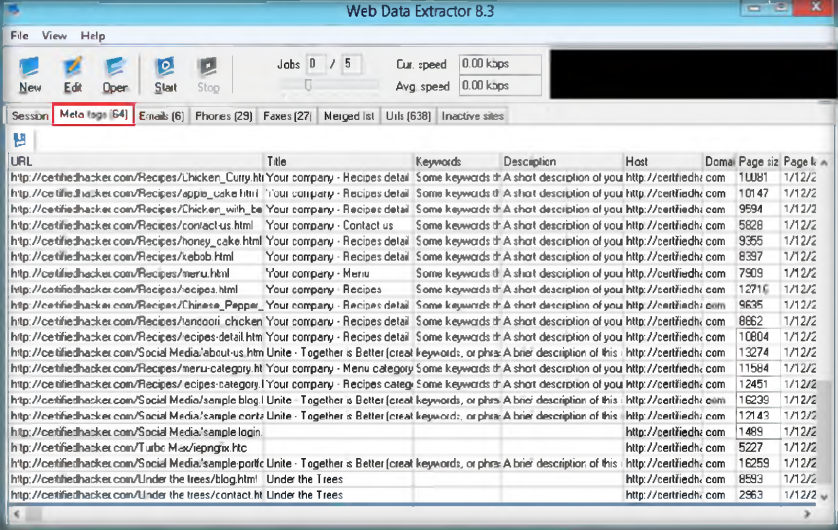
7. Mega tags tab to view URL, Tide, Keywords, Description, Host, Domain, and Page size information

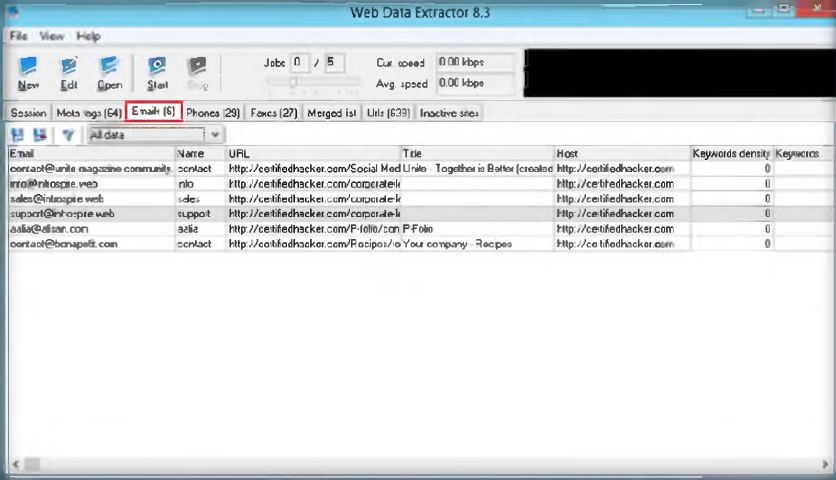
8. Emails tab to view the Email, Name, URL, Title, Host, Keywords density, and other information related to emails

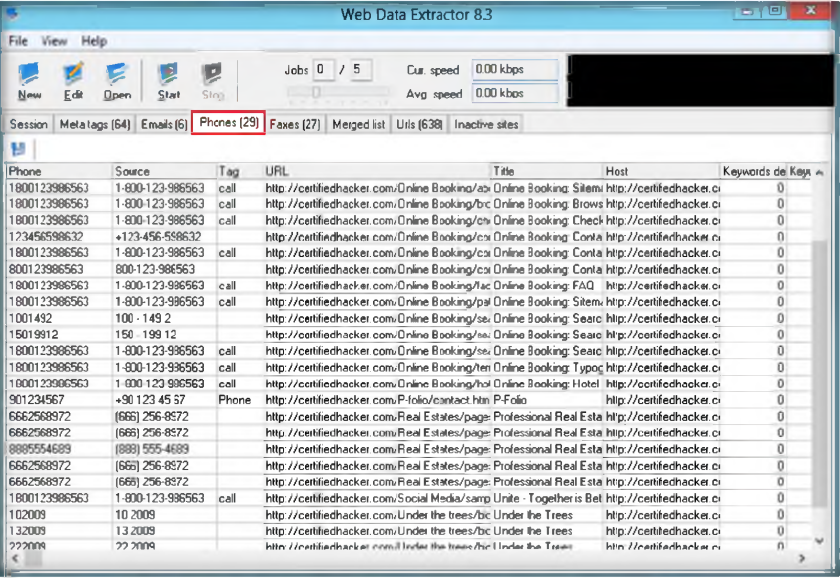
9. Phones tab to view the information related to phone like Phone number, Source, Tag.

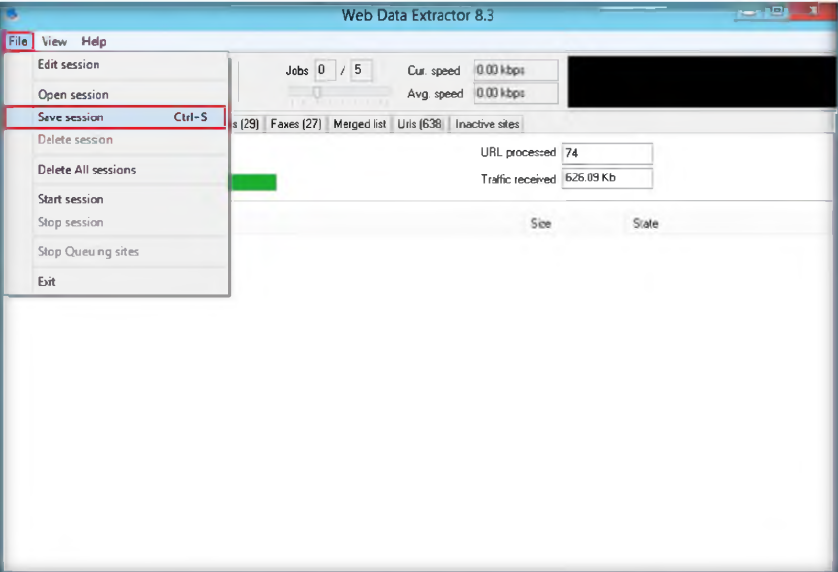
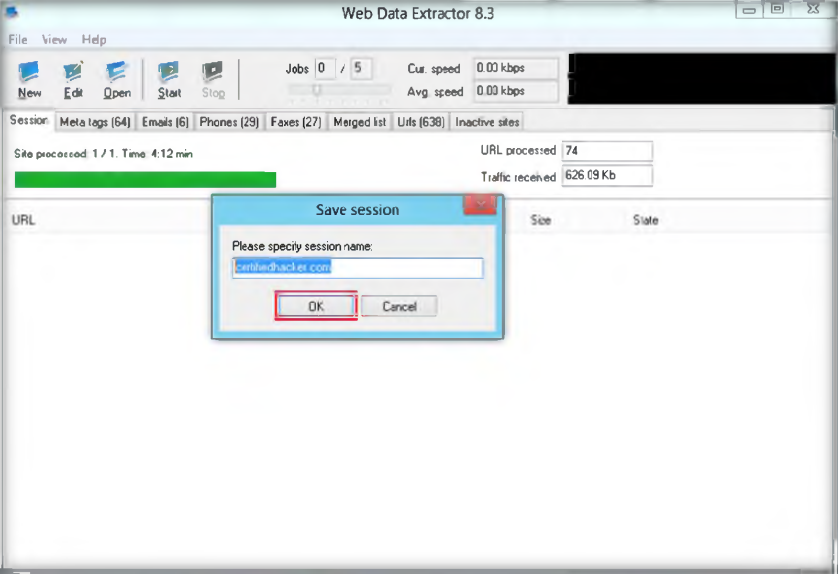
10. Check Faxes, merged list, urls, inactive sites as well to see other information. You can save this session by go to file then click save session.

11. Write name of the file and click OK

Posted by :

Bonfilio Aldrino Sugiarto – CS2020 – 2001611794


Troubleshooting Using Megaping

Filed in Uncategorized
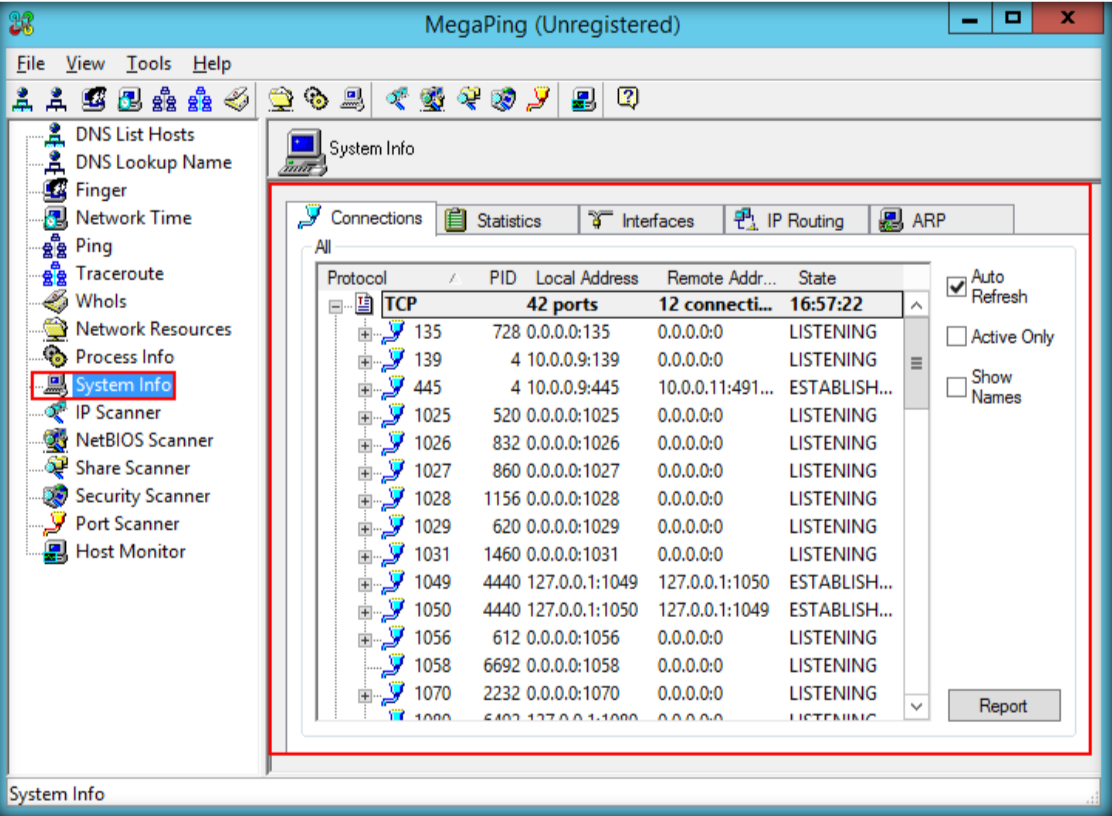
  1. Download megaping and finish the wizard installation. After finish all the installation, launch megaping and will show the agreement. Click agree and the GUI will appear on screen.

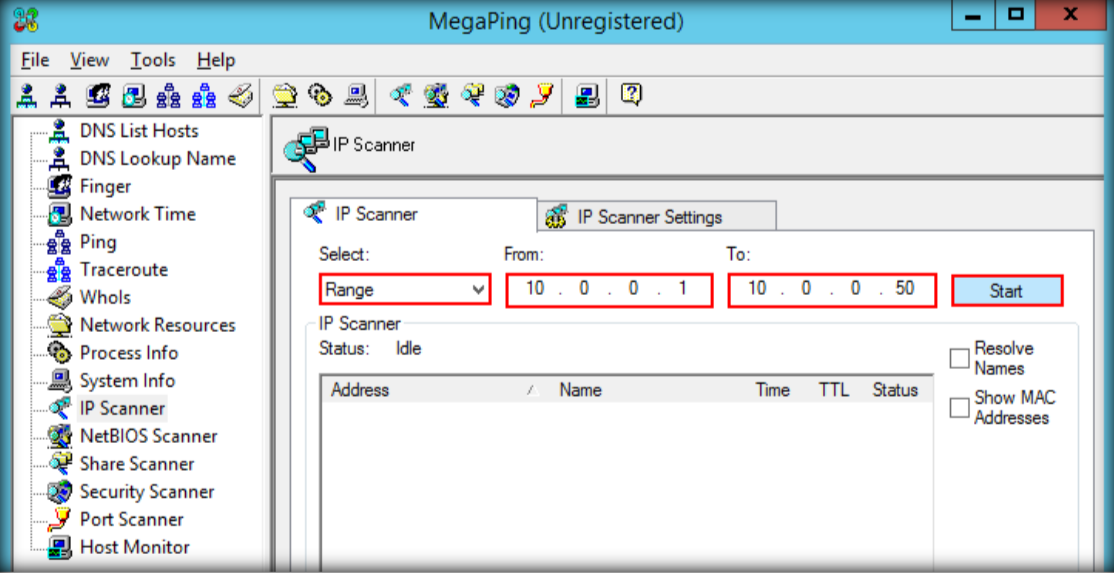
2.  Select IP scanner from the left pane of the window, set the IP range, then click start

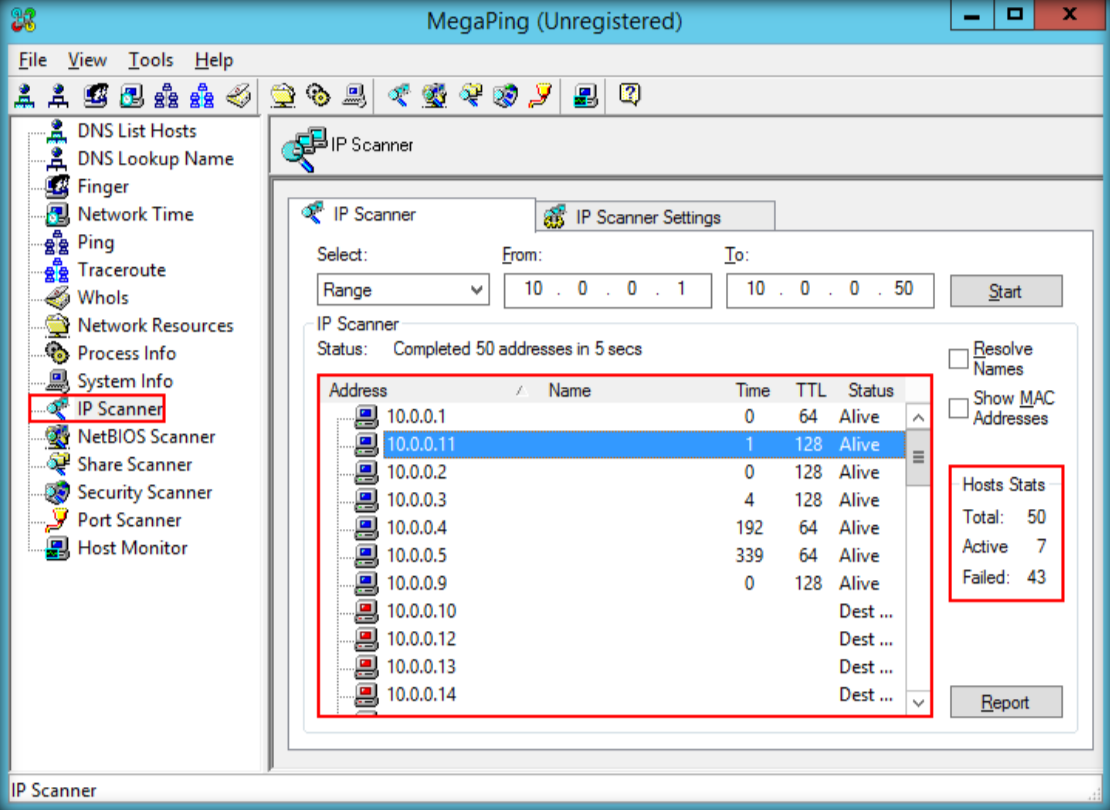
3. Result indicates all the IP address on the selected range with TTL, Status, host stats.

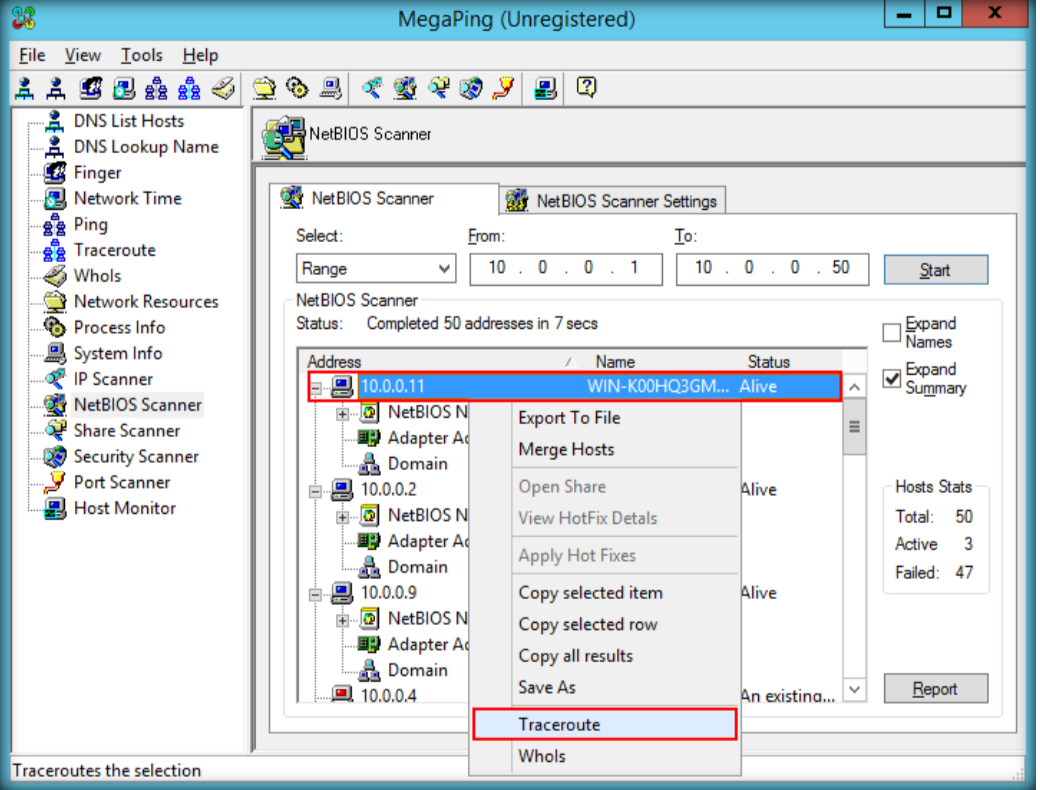
4. Right click on the IP, traceroute it

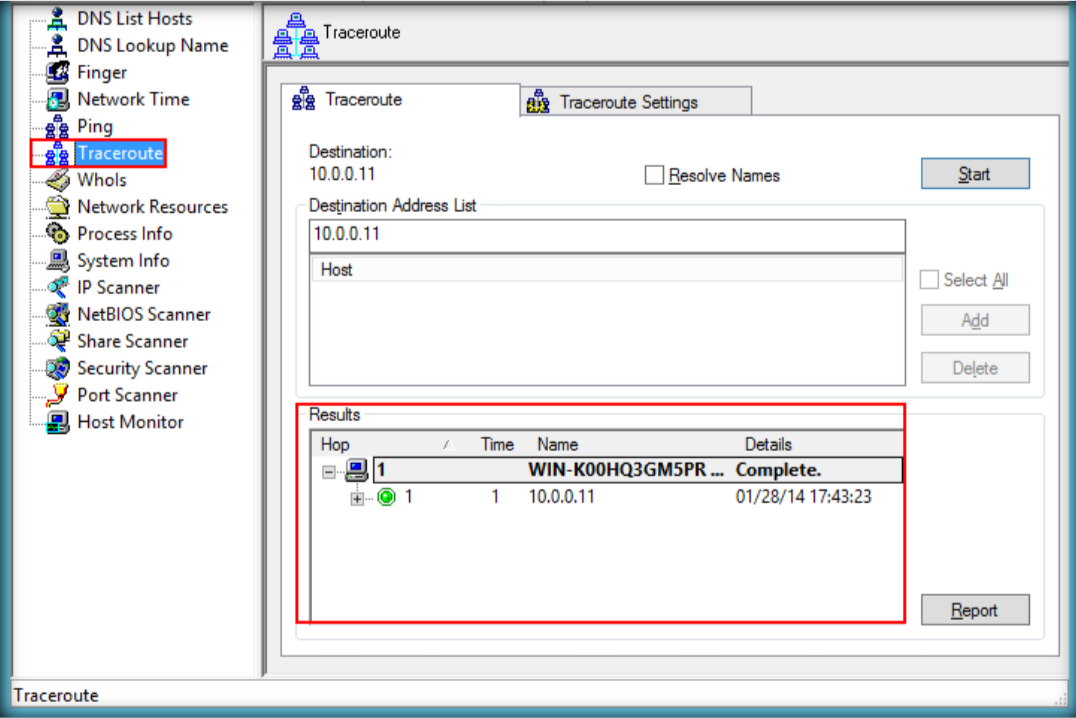
5. Megaping will show the traceroute and display number of hops to reach the server

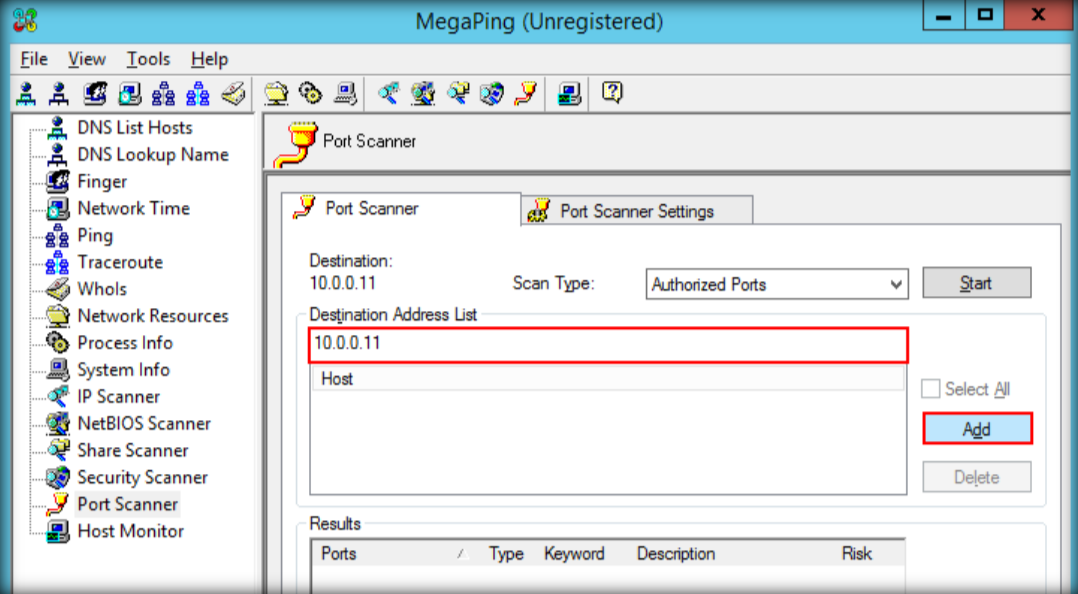
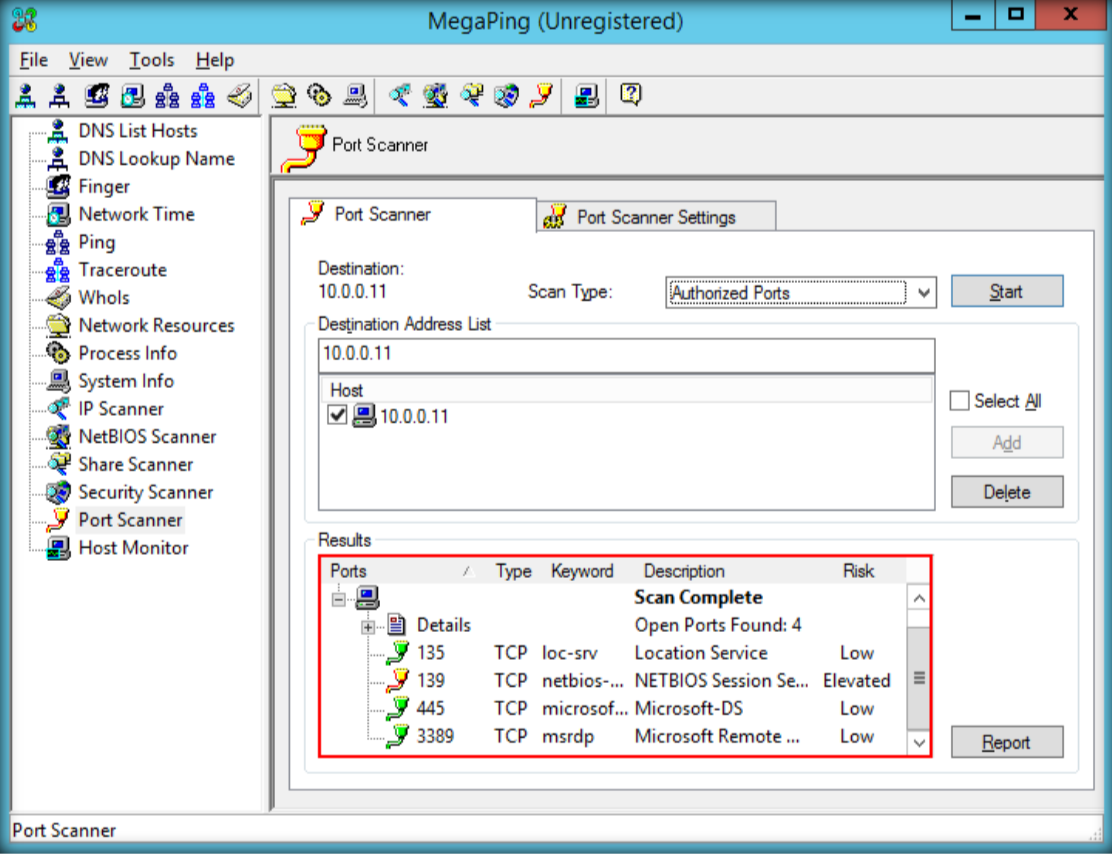
6. Select Port Scanner from left pane, enter IP address then click add.

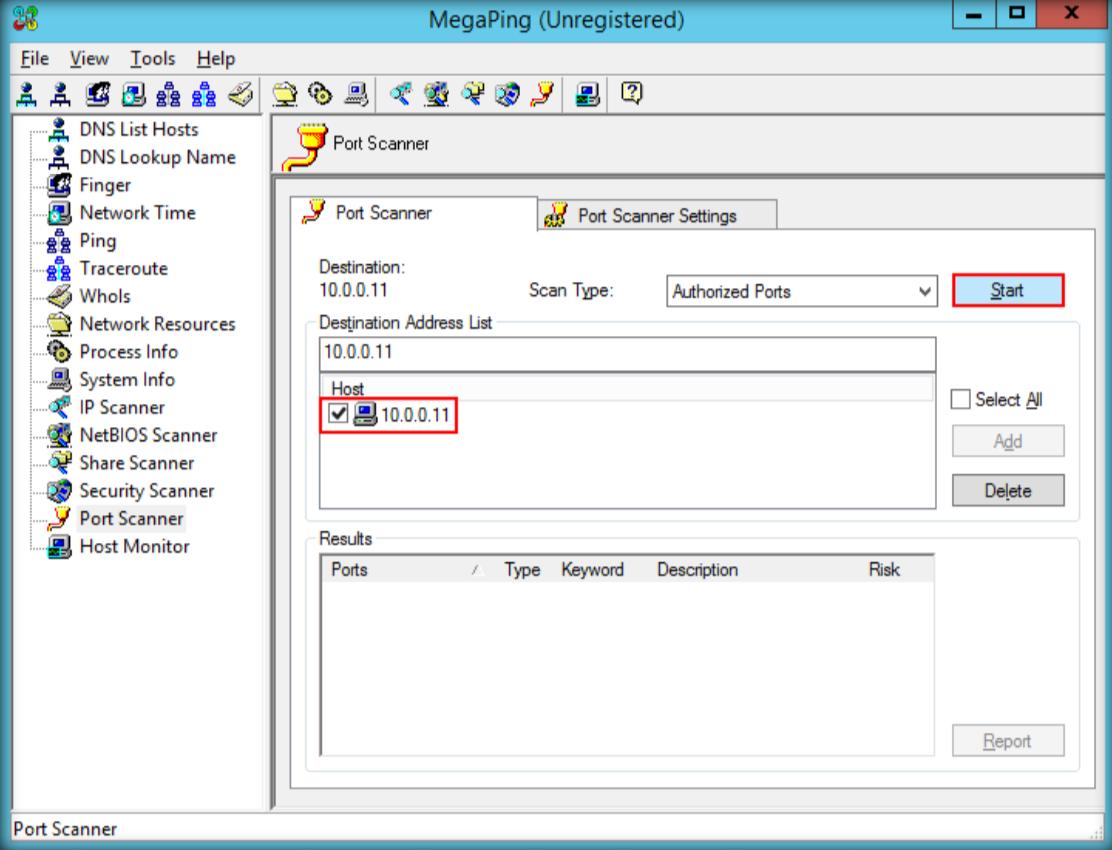
7. Check the IP address, then start the port scanner

8. Port scanner shows the port type, keyword, risk, port number, description.

Posted by :

Bonfilio Aldrino Sugiarto – CS2020 – 2001611794